protocols
Lab protocols for the Lowe-Power lab (scroll down for table of contents Readme)
Colony PCR
Writing/editing credits: Tiffany Lowe-Power Updated 20210118
General Tips
- Make a mastermix.
- Use a cheaper Taq-based PCR mix.
- Less is more. Bacterial cells and EPS can interfer with PCR. If you add enough cells so that it’s cloudy… that’s >106 cells. PCR doesn’t need that much DNA template.
- Colony PCR works better from liquid cultures than from colonies from plates. This protocol can likely be optimized further.
Colony PCR for E. coli
This “protocol” is an outline that you should amend with manufacturer’s instructions and internet searches.
Step 1: Patch E. coli and create liquid overnights
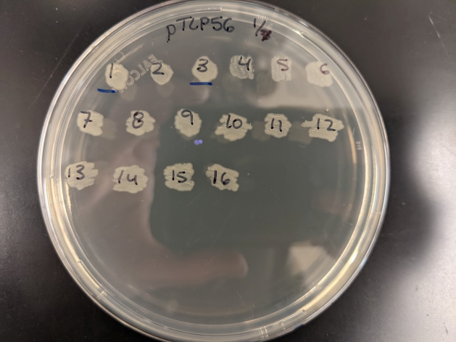
- Label a patch plate (LB+antibiotics) like the photo below. You will screen multiple “clones” of your construct. We refer to these as “pTLP54.1”, “pTLP54.2”, … Date the plate. Initials are optional (if not included in the plasmid name)
- Prep LB+antiobiotic in a 48-well deep plates with baffles (autoclavable and reusable). In your notebook, record the planned location where you will put each colony (use a plate layout excel template). Use the AliQ pipette handler to repeatedly dispense the broth.
- Using 1 sterile toothpick per colony, pick a silnge well-isolated colony. Patch it over a number on the patch plate. Then swirl the toothpick in the broth and discard.
- Incubate the 48-deep well plate at 37C with shaking overnight. Incubate the patch plate at 37C stationary overnight.
Step 2: Colony PCR
Set up the reactions on wet ice. If appropriate for the vector (Inspecting vector seq on Benchling can help you determine this), use M13F/R primers for PCR screen. Alternatively, use a pair of your Gibson cloning primers to PCR screen.
- Use Benchling to plan your PCR screen approach (i.e. which primers to use) and the ‘pcr_workbook.xlsx’ to plan your PCR Mastermix using a cheap Taq-PCR kit. Plan to use the parental vector as a negative control, if you have the parental vector.
- Use 1 ul of colony lysate as the template DNA
- Do 10 ul reactions per colony.
- Using a P200 multichannel, add 90 ul (sterile) milliQ water to PCR strip tubes. (n=however many colonies you are screening). Add 10 ul of the overnight liquid culture to the PCR strip tube. In the thermal cycler, incubate at 96-98C for 10 minutes.
- Prepare the PCR mastermix, and aliquot to PCR strip-tubes.
- Use P20 multichannel to add 1 ul colony lysate to PCR mix.
- Run a PCR reaction on the thermocycler with a program that matches the PCR kit, necessary extension time, and an anneal temperature suitable with your PCR screening primers.
Step 3: Run Agarose Gel to determine result of PCR screen
- Use 0.8 % w/v agarose in LiBOR (or appropriate higher/lower agarose concentration–google for why you would want to do this if you do not know). Note: thinner combs/wells will yield tighter bands than thick combs/wells. Your gel should have 1-2 drops of ethidium bromide solution in it.
- Load 5 ul ladder on either side of your gel/samples. Load your 10 ul reaction.
- Run gel at 200 V for 20-30 minutes. You can run LIBOR even faster, but don’t let it run off!
- Image gel on the antique (but functioning) gel imager in the 2nd floor common space (beyond the autoclaves). Bring your flash drive to save the gel photo. Safety do not touch door handles with gloves that have touched the ethidium bromide. Remove glove / put glove back on as needed. We have a “gel carrying container” above the gel station.
- Image the gel with UV light (button is rubbed off). You can zoom in/out and adjust the aperture (amout of light) manually on the camera. Only do this if you are previewing the gel with the software–this way you can undo if you make a bad adjustment. Capture an image and save it to your flash drive.
- If the gel had any successes, spend a moment to label the gel in powerpoint. Example below. (ProTip: Keep a Cloning.pptx in your digital lab notebook to quickly label each gel. You can copy/paste a lot of elements).
Note: Faint bands are often more clear if you invert the colors.
Cleaning up note: 1x LIBOR tends to grow mold in our lab. Don’t leave it in the gel boxes. Pour it into a 1L bottle. Cap. Reuse until it’s moldy, then start a new batch.
Validate the primers & PCR kit
This can be performed simultaneously with screening putants (putative mutants) or while you are waiting for putants to appear.
-
Template DNA: purified wildtype genomic DNA and a boil-prep of wildtype cells.
-
Perform PCR reaction as below.
Colony PCR on Ralstonia colonies
Ralstonia has always proven tricky for colony PCR. I suspect this is due to the high GC genome (difficult PCR targets) and something inhibitory to the PCR (maybe EPS?).
Only colony PCR after selected colonies have been re-struck for purity and grown.
20260617 update: Use of instagene matrix in updated protocol significantly reduces fail rate of colony PCR with Ralstonia
Materials:
- p20 & p200 pipettes
- 200 ul pipette tips
- thermocycler
- vortex mixer
- centrifuge
- PCR tubes
- cell source (plate, liquid culture, or cell pellet)
reagents:
- autoclaved MQ water
- stock instagene matrix or 0.125X instagene matrix
- store matrix & aliquots at 4C
- 0.125x instagene matrix can be prepared by creating a 1/8 dilution of stock matrix with MQ water
- manufacturer’s protocol
- product: BIORAD InstaGene™ Matrix #7326030
- Important Note: The InstaGene matrix is a slurry of Chelex resin, not a solution. Make sure to mix well before using to ensure you are adding a consistent amount of the matrix because the product will separate by gravity.
protocol:
- Add either 40 ul 0.125x instagene matrix or 35 ul MQ water + 5 ul stock matrix to PCR tube
- Add cell source to PCR tube and resuspend
- cell source options: 5 ul of liquid culture, single colony, or small sample of cell pellet
- (optional) incubate at 56°C in thermocycler for 15-30 minutes then vortex 10 seconds
- Incubate at 100°C in thermocycler for 10 minutes (8 minutes if 56°C incubation performed)
- Vortex 10 seconds
- Centrifuge 2 minutes
- Use supernatant as DNA template for PCR
- 1-3 ul supernatant for 20 ul PCR reaction
- 1-2 ul supernatant for 10 ul PCR reaction
- Store at -20°C. Centrifuge before use
Step 2: Run PCR
-
Plan your PCR screen approach as described in the section below (i.e. which primers to use) and the ‘pcr_workbook.xlsx’ to plan your PCR Mastermix using a PCR kit that is effective with multi-kb GC-rich template DNA (e.g. Phusion).
- Run with controls:
- “no template” negative controls
- Parental genotype negative control
- Positive control if possible (not possible in many cases, but is possible if screening for miniTn7 integration into the genome).
- If you identify the correct genotype, save the strain. See: Glycerol Stocks protocol
Problem solving
xxx to do: update this
- Problem: No bands
- Use a DNA extraction kit (e.g. Zymo xxx kit). Purify DNA.
- Problem: Bands are unexpected size.
- Gel extact the band (Zymo gel extraction kit) and submit for sanger sequencing with one of the colony PCR primers.
BLAST result and try to align result with Benchling plasmid maps
- Only sequence 1 of each spuriously sized band. Don’t waste time / consumable resources on this if you have clones with any of the correct mutant genotypes.
- Gel extact the band (Zymo gel extraction kit) and submit for sanger sequencing with one of the colony PCR primers.
BLAST result and try to align result with Benchling plasmid maps
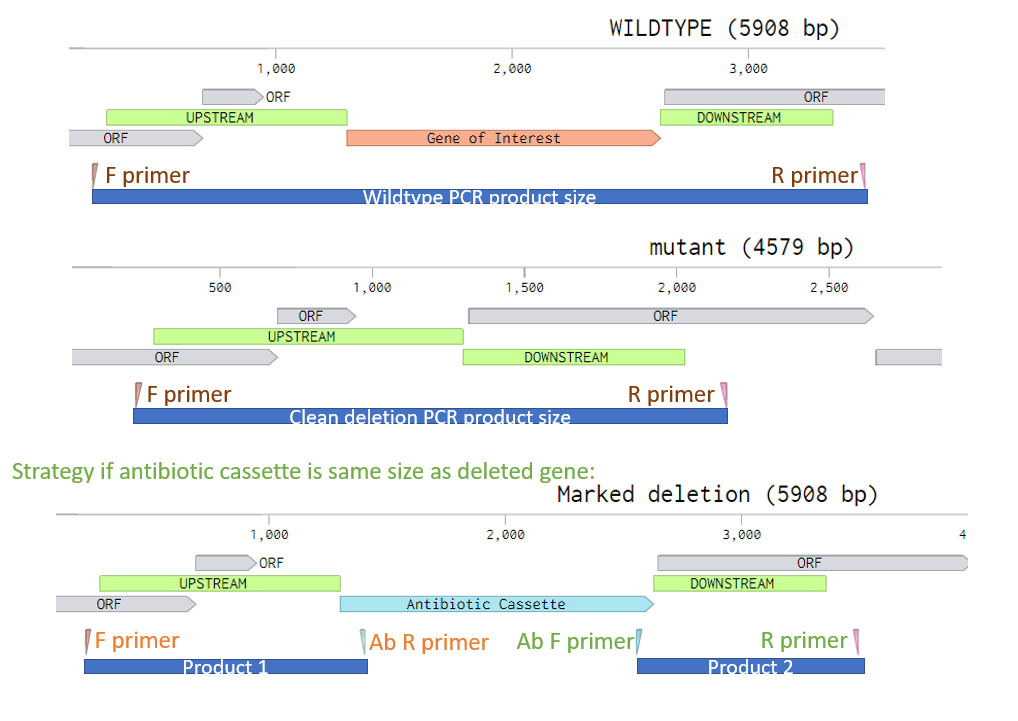
Primer Design: Detecting an unmarked deletion
- Use PrimerBlast to identify specific primers with
- Opt Tm ~60 C.
- Range that forces primers to bind outside of the upsteam/downstream regions used in the knockout vector. This is essential. See diagram below for ideal primer placement.
Things to update on this protocol:
- identity/location of the gel imager
- recommendation of polymerases. Let’s get samples and try some PCRs!
- Is this cheaper than Phusion and better than OneTaq for colony PCR? https://www.neb.com/products/m0287-longamp-taq-2x-master-mix#Product%20Information
- How about Kapa2G? https://www.kapabiosystems.com/product-applications/products/pcr-2/kapa2g-robust-pcr-kits/